If there’s one thing we know here at Texas Final Drive, it’s how we wish people would maintain their final drive motors. That’s why we’ve come up with this comprehensive guide to final drive motor maintenance. It touches on more than just the final drives, though, because issues such as track tension and even a dirty undercarriage can impact the performance of your final drives and cause premature wear.

Want to avoid expensive final drive repairs? Then start maintaining your final drive right.
A neglected final drive can lead to overheating, leaks, and complete failure. But with the right routine, you can extend its lifespan, cut repair costs, and maximize performance. Here’s how to make sure your final drive never lets you down.
Routine maintenance not only prevents unexpected breakdowns and costly repairs but also extends the life of your equipment, saving you time and money in the long run. Neglecting essential maintenance tasks can lead to excessive wear, overheating, fluid contamination, and even complete system failure.
You can keep your final drive running smoothly and efficiently by following a structured maintenance routine—including checking and changing gear oil, inspecting for leaks, replacing filters, and cleaning the undercarriage. This guide outlines the key maintenance steps that will help you protect your investment and maximize uptime.
Table of Contents
- Making the Case for Maintenance
- Check Gear Oil Levels
- Change Gear Oil
- Replace Case Drain Filter
- Check for Leaks
- Clean the Undercarriage
- Check Track Tension
- Conclusion
Making the Case for Maintenance
Preventive maintenance isn't just a recommendation—it’s a necessity if you want to protect your investment, reduce repair costs, and maximize the performance of your final drive motor. Many operators fall into the costly trap of reactive maintenance, waiting for something to break before taking action. This approach leads to unnecessary downtime, expensive repairs, and in some cases, complete equipment failure. Instead, adopting a proactive instead of a reactive maintenance approach ensures that small issues are caught early before they turn into major problems that can derail your operations.
Routine inspections and scheduled maintenance allow you to spot early warning signs, such as low gear oil levels, contaminated oil, or leaks, preventing irreversible damage. Proper upkeep doesn’t just extend the lifespan of your final drive—it also improves overall machine efficiency, leading to reduced fuel consumption and better performance on the job site.
Some operators hesistate to invest in preventive maintenance, seeing it as an unnecessary cost. However, the reality is that preventive maintenance costs a fraction of what you’ll pay for a major repair or premature final drive replacement. Well-maintained equipment also holds its value better, making it a smarter financial investment over time. By committing to regular maintenance, you avoid project delays, reduce unexpected expenses, and ensure your machine is always ready to perform when you need it most.

Investing in preventive maintenance is one of the most effective ways to maximize the lifespan of your final drive motor and reduce long-term operating costs. Reactive maintenance—waiting until something breaks to fix it—can lead to expensive repairs, unexpected downtime, and even complete equipment failure. By contrast, a proactive approach to maintenance ensures that minor issues are addressed before they escalate into major problems.
Regular inspections and scheduled maintenance allow you to catch early warning signs, such as low gear oil levels, contaminated oil, or leaks, before they cause irreversible damage. Routine servicing extends the life of your final drive and enhances machine efficiency, leading to lower fuel consumption and improved overall performance.
While some operators may hesitate to invest time and resources into maintenance, the cost savings over time far outweigh the expenses associated with major repairs or replacement parts. In addition, well-maintained equipment retains a higher resale value, making it a more profitable investment in the long run. Prioritizing maintenance reduces the risk of project delays and lost productivity, ensuring that your equipment remains reliable and ready for any job.
Check Gear Oil Levels
Gear oil, which is significantly different from motor oil, is essential for lubricating the internal components of a final drive, preventing excessive wear, reducing friction, and dissipating heat. Ensuring that the gear oil is at the proper level helps maintain the efficiency and longevity of the motor. It is also important to use the correct kind: gear oil for a typical final drive would be 80/90W, and we have our own WFP brand of recommended gear oil. Gear oil levels should be checked about once every 100 hours or once a month.
Steps for Checking Gear Oil Levels:
- Position the Machine Properly:
- Park the equipment on level ground to ensure an accurate reading.
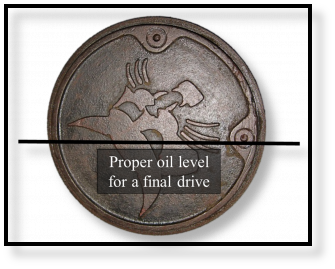
- Try to adjust the position of the final drive so that the cover plate has the plugs arranged as shown above.
- Turn off the engine and allow the final drive to cool before proceeding.
- Locate the "Check" Plug:
- The check plug on the cover plate of the final drive motor.
- There are at least two plugs 90 degrees from each other.
- Remove the Check Plug:
- Using the appropriate wrench, carefully loosen and remove the check plug.
- Be prepared for some gear oil to seep out if the level is full.
- Assess the Oil Level and Condition:
- The gear oil level should be at the bottom of the check plug hole.
- If oil does not reach the opening, more gear oil needs to be added.
- Observe the color and consistency of the oil—clean oil should be a clear amber color, while dark, cloudy, or metallic-looking oil indicates contamination and/or wear issues.
- Refill if Necessary:
- If the oil level is low, add the manufacturer-recommended gear oil through the fill plug at the top.
- Slowly pour in the oil until it begins to seep out of the check plug opening, indicating that it has reached the proper level.
- Secure the Plugs and Clean Up:
- Reinstall the check plug tightly to prevent leaks.
- Wipe away any excess oil from the final drive housing.
- Dispose of any used oil or contaminated rags according to environmental regulations.
Indicators of Low or Contaminated Oil:
If your gear oil is low or contaminated, you might notice the following signs:
- A whining or grinding noise from the final drive motor.
- Overheating or excessive heat near the final drive housing.
- Visible metal shavings or sludge in the oil, indicating internal component wear.
- A burnt smell or excessively dark oil, suggesting oxidation or contamination.
Regularly checking the gear oil level and condition helps ensure your final drive operates smoothly and prevents costly repairs due to lubrication failure.
 Change Gear Oil
Changing the gear oil in your final drive is essential to maintaining proper lubrication, preventing contamination, and reducing internal wear. Over time, gear oil degrades due to heat, debris, and metal shavings from normal wear and tear. Leaking seals can allow contamination like dust and moisture in.
Gear oil in a final drive should be changed about once a year. Neglecting regular oil changes can lead to increased friction, overheating, and potential failure of internal components. Also keep in mind the importance of quality gear oil as an investment in your final drive's life and performance.
Steps for Changing Gear Oil:
- Prepare the Equipment:
- Park the machine on level ground and allow the final drive to cool.
- Gather necessary tools, including a wrench, an oil catch pan, and fresh manufacturer-recommended gear oil.
- Drain the Old Oil:
- Locate the drain plug at the lowest point of the final drive.
- Place a container under the drain plug to catch the old oil.
- Remove the plug and allow all the oil to drain completely.
- Inspect the drained oil for metal shavings or unusual discoloration, which could indicate internal wear.
- Dispose of Old Oil Properly:
- Follow local environmental regulations for disposing of used oil.
- Never dump oil into the ground or water sources.
- Refill with New Gear Oil:
- Remove the fill plug located at the top of the final drive.
- Slowly pour in the manufacturer-recommended oil. This will usually be
- Continue filling until the oil reaches the check plug opening.
- Reinstall Plugs and Clean Up:
- Securely tighten the drain and fill plugs to prevent leaks.
- Wipe away any spilled oil around the final drive housing.
Signs That Oil Needs to Be Changed Sooner Than Scheduled:
Sometimes the gear oil needs to be changed more often than the standard. Here are some signs:
- Oil appears dark, cloudy, or milky (indicating contamination).
- Presence of metal shavings or grit in the drained oil.
- A burnt smell or unusually thick consistency.
- Unusual noises or overheating in the final drive.
Regularly changing the gear oil at recommended intervals—or sooner if contamination is detected or if the system has been overheating—ensures your final drive operates smoothly and avoids costly repairs due to lubrication failure.
Replace Case Drain Filter

The case drain filter plays a crucial role in protecting the final drive motor by filtering out contaminants from the hydraulic fluid as it returns to the hydraulic fluid reservoir. Contaminants such as metal shavings, dirt, and debris can cause excessive wear on internal components, leading to premature failure and costly repairs.
A clogged or failing case drain filter can result in increased case pressure, which can damage seals and lead to hydraulic leaks. In fact, if the case drain filter becomes clogged, pressure can build up enough to crack the main housing, blow the bearings apart, and launch the cover plate through the air. Enough case drain related failures come through our shop doors to make this an important topic. However, keep in mind that not all machines will have case drain filters.
Signs of a Clogged or Failing Case Drain Filter:
Here are some signs to look for, but remember that by the time you see them it may be too late to save your final drive:
- Excessive pressure buildup within the hydraulic system.
- Leaking seals or oil seeping from the final drive housing.
- Overheating or reduced performance of the final drive motor.
- Presence of metal shavings or debris in the drained hydraulic fluid.

Recommended Replacement Intervals:
- The case drain filter should be replaced at regular intervals as specified by the equipment manufacturer.
- We recommend replacing it when replacing the other hydraulic system filters.
- If contamination is detected in the hydraulic system, replace the filter immediately to prevent further damage.
Steps for Replacing the Case Drain Filter:
- Locate the Case Drain Filter:
- The case drain filter is typically positioned along the case drain line, which allows excess hydraulic fluid to return to the reservoir.
- Refer to your equipment’s service manual to pinpoint its exact location.
- Remove the Old Filter:
- Ensure the machine is powered off and depressurize the hydraulic system before beginning.
- Using an appropriate wrench, carefully loosen and remove the filter.
- Inspect the removed filter for debris, excessive wear, or clogging.
- Dispose of the Old Filter Properly:
- Used hydraulic filters should be disposed of in accordance with local environmental regulations.
- Never discard filters in general waste, as they contain hazardous residues.
- Install a New Filter:
- Use only OEM or high-quality replacement case drain filters that meet manufacturer specifications.
- Apply a small amount of clean hydraulic fluid to the gasket to ensure a proper seal.
- Secure the new filter in place, ensuring it is tightened properly but not overtightened.
- Test the System:
- Start the equipment and allow the hydraulic system to circulate fluid.
- Check for leaks and ensure the system is operating at normal pressure.
By regularly replacing the case drain filter, you help maintain optimal hydraulic performance, extend the lifespan of the final drive, and prevent costly breakdowns due to contamination or pressure-related issues.
Check for Leaks
Detecting and addressing leaks in your final drive early can prevent severe damage and costly repairs. Leaks can occur for various reasons, including high case pressure, overfilled or degraded gear oil, worn-out seals, or physical damage. Understanding where the leak is located and how much fluid is present can provide valuable insight into the source of the issue.
Common Causes of Final Drive Leaks:
- High Case Pressure: Often caused by a clogged case drain filter, leading to seal failure.
- Overfilled or Contaminated Gear Oil: Excessive oil levels can put pressure on seals, while degraded oil can cause internal wear.
- Worn-Out Seals: Over time, seals degrade due to heat, contamination, and prolonged use.
- Physical Damage: External impacts from debris or rough terrain can crack housing components and cause leaks.
How to Inspect for Leaks:
- Check Around the Final Drive Housing:
- Perform a visual inspection for any signs of oil seepage or residue.
- Look for oil pooling around the outer casing, which may indicate a failed seal or damaged housing.
- Assess the Location of the Leak:
- Leak near the case drain line: This often indicates a clogged case drain filter causing excessive pressure buildup.
- Leak from the main housing seam: Could be caused by a cracked housing or failed gasket.
- Leak at the sprocket seal: Suggests worn-out seals or excessive gear oil pressure.
- Determine the Amount of Fluid Present:
- A small seepage May indicate a minor seal issue that needs monitoring.
- A continuous drip: Could suggest a failing seal that needs replacement soon.
- Large fluid loss or pooling: Indicates a serious issue requiring immediate attention to prevent system failure.
- Monitor Case Drain Pressure:
- Use a pressure gauge to check the case drain line for excessive backpressure.
- High pressure readings suggest a clogged filter, leading to seal damage and leaks.
Identifying the Liquid
If you have a thick fluid dripping on the tracks or behind the sprocket, then your leak is gear oil coming from the gear hub. Large amounts of a very thin fluid will be hydraulic fluid leaks.
Steps to Address and Prevent Leaks:
- Regularly inspect seals and gaskets for wear and replace them as needed.
- Keep gear oil at the proper level and change it at recommended intervals.
- Ensure the case drain filter is replaced on schedule to prevent pressure buildup.
- If a leak is detected, address the root cause before simply replacing seals to prevent recurrence.
By thoroughly inspecting for leaks and understanding their origins, operators can take proactive steps to maintain the integrity of the final drive and prevent costly downtime.
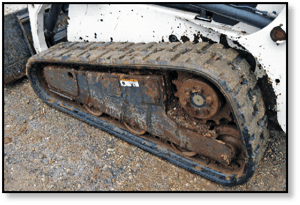
Clean the Undercarriage
The undercarriage of your equipment plays a crucial role in protecting the final drive, yet it is one of the most commonly neglected areas when it comes to maintenance. Mud, dirt, and debris buildup can cause excessive wear on components, reduce overall machine efficiency, and even lead to costly repairs. A build up of sand and clay forms a horribly abrasive paste, for example, that can accelerate component wear. This is why experts recommend cleaning the tracks (and exposed portions of the undercarriage) every day.
Impact of Debris Buildup on Final Drive Performance:
- Packed mud and debris add unnecessary weight, increasing stress on the final drive motor.
- Dirt accumulation around seals can accelerate seal wear, leading to leaks and contamination.
- Failure to keep the undercarriage clean can lead to overheating and reduced efficiency in the drive system.
- In extreme cases, excessive debris can displace the final drive's main seal, allowing contaminants to enter and cause internal damage.
Recommended Cleaning Schedule and Methods:
- Remove Packed Debris:
- Use a pressure washer or scraper to remove dirt and mud from track rollers, sprockets, and idlers
- Clear out any debris lodged around the final drive housing.
- Wash Off Accumulated Mud:
- Avoid allowing mud to dry and harden, as removing and trapping moisture that leads to rust and corrosion can become difficult.
- After operating in wet or muddy conditions, perform a thorough washdown.
- Inspect for Excessive Wear While Cleaning:
- Check for any signs of loose bolts, worn-out seals, or cracks in the final drive housing.
- Look for any indications that the main seal has been pushed out due to debris buildup.
Benefits of Maintaining a Clean Undercarriage:
- Reduced Wear and Tear: Prevents accelerated damage to seals, bearings, and other components.
- Improved Efficiency: Reduces unnecessary strain on the final drive, improving overall performance.
- Easier Maintenance: It makes spotting potential issues easier before they become serious problems.
- Longer Equipment Lifespan: Protects critical components, reducing costly downtime and repairs.
Keeping the undercarriage clean is a simple yet highly effective way to prevent unnecessary wear and ensure the longevity of your final drive system. A little time spent on cleaning can save you significant repair costs down the road. And a dirty undercarriage can impact the track tensions, which is our next focus of discussion.
Check Track Tension
 Proper track tension is crucial for maintaining the health of your final drive motor and ensuring optimal machine performance. Tracks that are too loose can slip, causing excessive wear on the sprockets and drive motor while running the risk of completely derailing. On the other hand, overly tight tracks put unnecessary strain on the final drive because it requires more to turn the tracks, which then increases the risk of premature wear and failure.
Steps for Checking and Adjusting Track Tension:
- Park on a Level Surface: Ensure the machine is on stable, flat ground before checking track tension.
- Lift the Track Off the Ground: Using the equipment’s boom or lift mechanism, slightly raise the track to allow it to hang freely.
- Measure the Track Sag: Refer to your manufacturer’s guidelines for the correct amount of sag. Typically, a properly tensioned track will have a certain amount of slack when measured from the middle of the undercarriage.
- Adjust the Track Tension:
- If the track is too loose, use the grease fitting adjustment method to add grease and increase tension.
- If the track is too tight, release grease to allow for more slack.
- Recheck the Tension: Lower the equipment and check for proper tension once the adjustment is made.
Why Proper Track Tension Matters:
- Prevents excessive stress on the final drive motor.
- Reduces wear and tear on sprockets, rollers, and track components.
- Improves overall efficiency and longevity of the undercarriage.
Ignoring track tension can lead to unnecessary wear, reduced efficiency, and costly repairs. Making track tension checks a regular part of your maintenance routine will help protect your final drive and extend the life of your machine.
Conclusion
Regular final drive maintenance is essential for maximizing your equipment's lifespan, efficiency, and performance. You can prevent unexpected failures and reduce costly downtime by following a structured maintenance routine—including checking and changing gear oil, inspecting for leaks, replacing filters, and cleaning the undercarriage. Investing in preventive maintenance saves you money in the long run and keeps your machines operating at peak efficiency, ensuring you get the most out of your investment.
Ignoring these essential maintenance tasks can lead to severe damage, increased repair costs, and reduced equipment reliability. By implementing a proactive maintenance schedule and addressing issues early, you can extend the life of your final drive and avoid unnecessary headaches.
If your final drive is showing signs of wear or failure, don’t wait until it’s too late. We offer high-quality new and remanufactured final drive motors and expert final drive repair services to get your equipment back in top shape. Contact us today to find the best solution for your needs and keep your machine running strong!