Final Drive Motor Preventive Maintenance

Based on our own experience here at Texas Final Drive, the maintenance for final drives can be broken into four key tasks. When these tasks are performed as recommended, they will greatly extend the life of your final drive, keep your equipment running, and save you money. Let's see what these four tasks are ...
The Shop Talk blog has several other posts you might be interested in, including these:
- The Very Real Dangers of Reactive Maintenance of Final Drives
- Final Drives: Remanufactured versus Rebuilt
- 7 Quick Tips for Skid Steer Maintenance in Extreme Weather
Task #1: Checking the Gear Oil
 Experts say you should check the gear oil level in your final drive about once every 100 hours of operation. Here are some guidelines on how to do that:
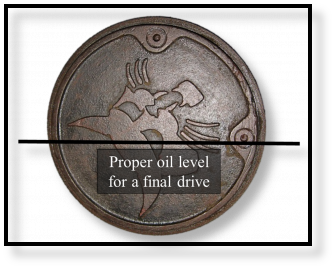
- When you look at the cover plate of your final drive or travel motor, you should notice two or three plugs. Arrange your final drive so that one plug is at the 12 o’clock position and the other plug is at the 3 o’clock position, as shown in the image.
- Carefully remove any debris, dirt, mud, sand, soil, etc. from around the plugs so that the gear oil isn’t contaminated as you remove the plugs.
- Remove both plugs slowly. You may need to strike the plugs with a hammer to loosen them. Keep in mind that the upper plug is for venting purposes and the lower plug is level with the ideal amount of gear oil needed.
- If the drive has sufficient gear oil, the oil will be level with the 3 o’clock opening, with just a small amount draining out. If the gear oil is low, then you need to add additional oil through the 12 o’clock opening until it begins to run out at the 3 o’clock opening.
- Once you have finished topping off the oil, replace both plugs.
A good rule of thumb for topping off the gear oil in a final drive is "half full is full."
Task #2: Changing out the Gear Oil
You should change out the gear oil (also known as gear lube) at least once a year. It’s best to do this when the oil is warm because it will be much easier for it to drain out. Here are the steps needed to change out the gear oil:
- Arrange the final drive so that the plugs are in the 3 o’clock and the 6 o’clock position. The 3 o’clock opening is for venting while the 6 o’clock opening will allow the oil to drain out.
- As before, clean out any debris from around the plugs and remember that you may need to strike the plugs with a hammer to loosen them. Remove both plugs, starting with the bottom plug first and then slowly removing the top plug.
- As the oil is drained out from the plug in the 6 o'clock position, make sure there are no metallic shavings or metal flakes in the oil. The presence of metal in the oil is indicative of a problem inside the gear hub which means your final drive needs to be serviced.
- When you are ready to add the fresh gear oil, arrange the final drive so that the openings are in the 12 o’clock and 3 o’clock position.
- Add fresh gear oil through the 12 o’clock opening until it begins to run out the 3 o’clock opening. DO NOT mix different types of oil.
- Once you’ve finished adding the oil, replace the plugs.
Task #3: Checking the Case Drain Filter
 About 90% of final drives and travel motors are going to have a case drain filter. The case drain filter is on the return line to the hydraulic tank, and its purpose is to filter out impurities from the hydraulic fluid as it leaves the travel motor.
If this filter is not checked/changed on a regular basis, it can become clogged, causing a tremendous pressure build-up in the travel motor, and eventually catastrophic damage.
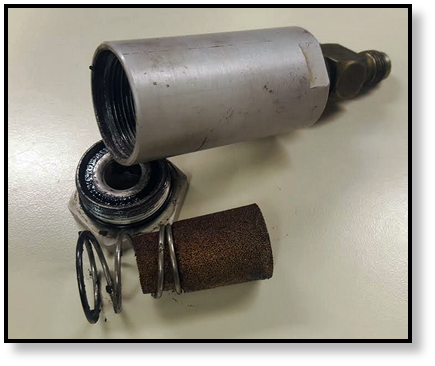
To check the case drain filter, you start by locating the case drain line. It will be a small line next to the in and out hydraulic lines. Follow the line until you encounter the filter, which typically looks like an aluminum canister about 3.5” long and about 1.25” in diameter.
Remove the filter from the drain line, plug the drain lines to avoid ootential contamination and loss of hydraulic fluid, and then inspect the filter. To inspect the filter, unscrew the hex nut and pull out the tapered sintered-bronze filter element as well as the springs that are holding it in place. If the filter element is no longer bronze colored, it needs to be replaced.
Task #4: Looking for Leaks
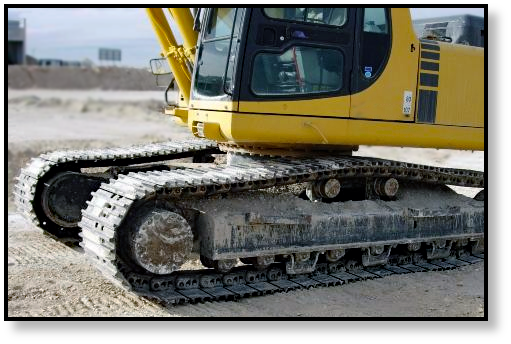
Leaks can be detected quickly if the operators practice a daily walkaround. There are two types of leaks on a final drive: a hydraulic leak and a gear oil leak. Gear oil leaks can be detected by checking for oil behind the sprocket or dripping on the tracks in a tracked machine. A gear oil leak is usually tied to the mechanical face seal (aka, duo cone seal or floating face seal) and needs to be addressed ASAP.

Hydraulic leaks involve a very thin fluid (the consistency of brake fluid) that comes from either a leaking hose (which is a relatively easy fix) or a problem in the hydraulic portion of your final drive. If it isn’t due to a leaking hose, it is most likely a clogged case drain filter. Note that if you find an excessive amount of fluid leaking, its probably going to be hydraulic fluid because there are only a few quarts of gear oil in a final drive.
Conclusion
There are four primary maintenance tasks for a final drive that, when performed as regularly, can literally save you thousands of dollars in repairs:
- checking and changing the gear oil
- checking the case drain filter
- regularly checking for leaks
Texas Final Drive provides best-in-class reman hydraulic drive motors for many O.E.M. brands. Check out the some of the top selling fitments for CASE Compact Track Loaders.

